
How to Setup iPad Pro for Data Science / Machine Learning Development - Part 1: Getting a Terminal Interface with Cloud Instance
Introduction
This spring, with the release of the 4th gen iPad Pro (2020) and the ground-breaking Magic Keyboard, I finally made the decision to take the leap from my aging iPad Air 2 (which became a smart home console a year ago) in getting my first ever iPad Pro. With all the hype about this new generation of iPad Pros, I am sure readers of this post won’t need me to discuss the pros and cons about this device. One thing, however, did concern me as a data scientist and had been the biggest deterring factor stopping me from getting a new iPad:
How to turn the iPad Pro into a data science / machine learning ready device when it is locked in the iPad OS / iOS mobile operating system?
Apparently, the fact that I ended up purchasing iPad Pro and that I’m writing this tutorial indicates that I’ve made the necessary steps to turn the iPad Pro into a DS / ML powerhouse.
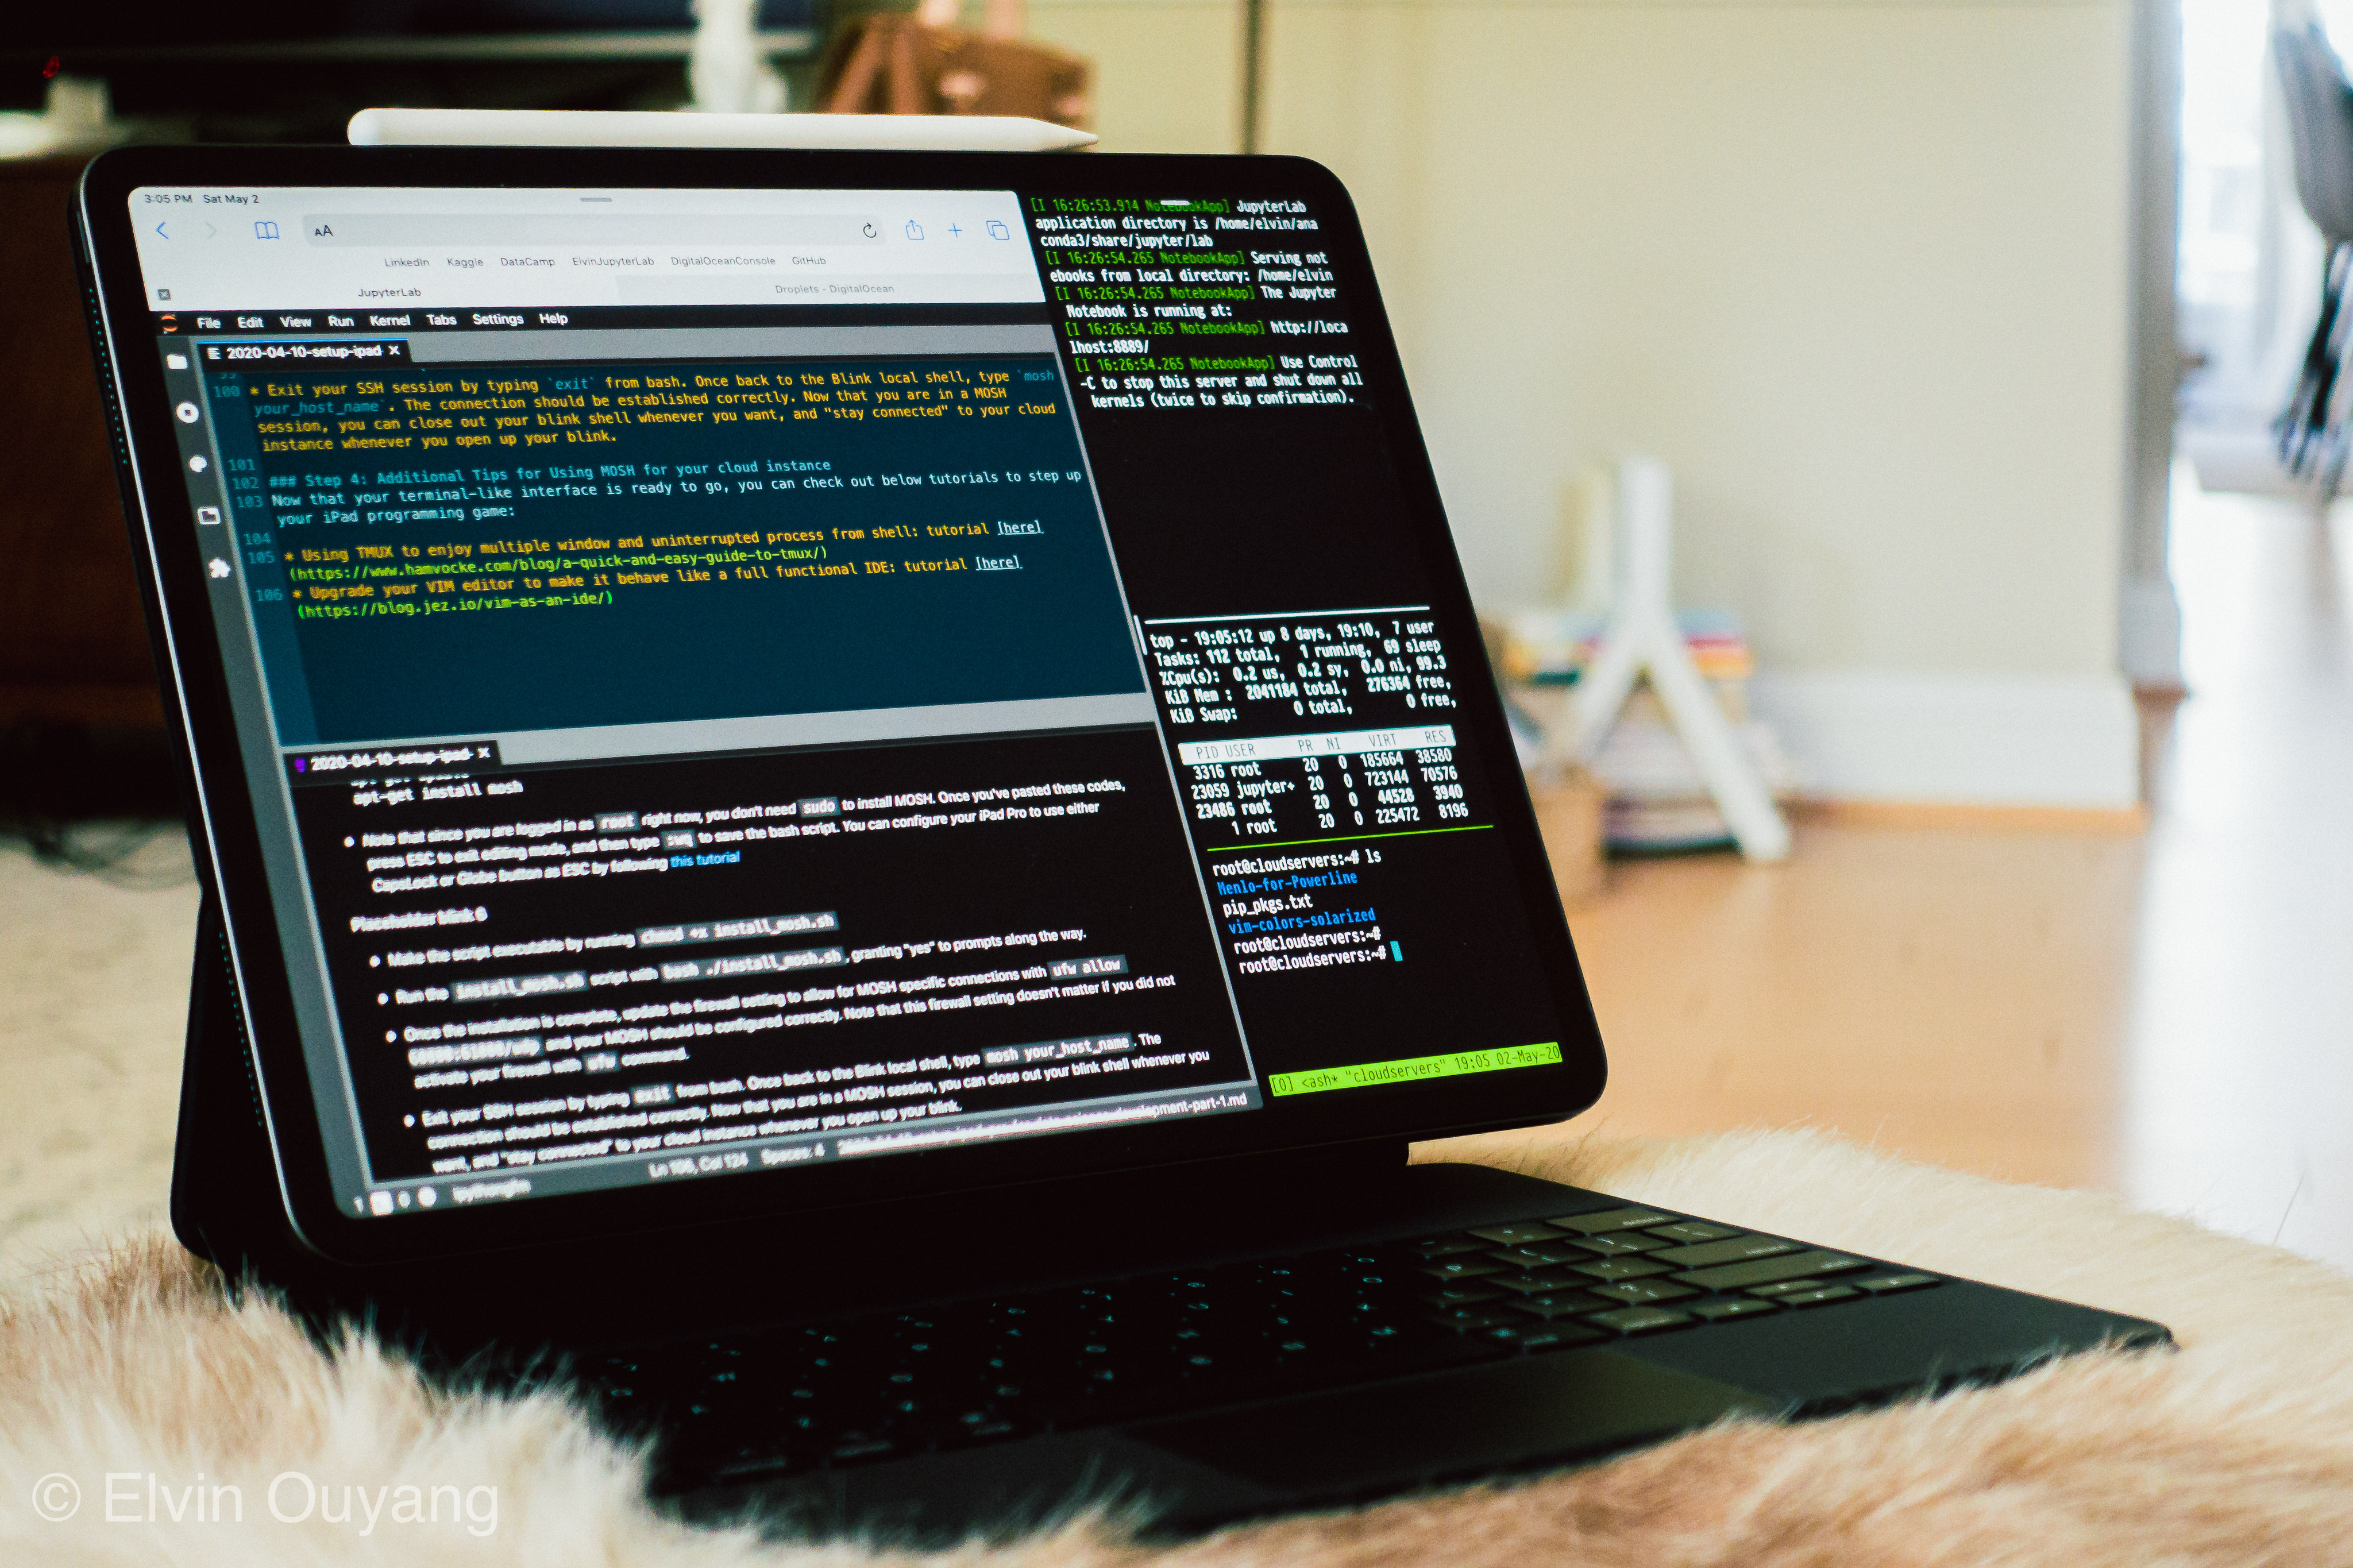
In this Part 1 of my iPad Pro for Data Science Development series, I will walk you through the steps I followed in creating a functioning Terminal / Command Line access to the DS / ML environment from my iPad Pro.
Pre-requisites
In order to complete this setup, you will need to be comfortable with the following factors:
- You need to be able to maintain constant Internet access for your iPad Pro
- You’ll need to have a little bit of understanding on how to run
bashcommand / scripts, since most of cloud instance uses Linux OS - You can expect paying monthly around one to three cups of latte (5 - 15 USD) for the convenience of running an always-on cloud instance from your mobile device. Maybe consider canceling a few of the monthly subscriptions on apps to make room for this budget.
Cloud Computing with iPad
The essential idea of being able to run a full DS / ML environment (or actually any development environment) on iPad is having an always-on cloud instance running from a cloud service provider, waiting on you as a user to access it via Internet from anywhere in the world. None of the fundamental technologies / solutions I’m about to introduce here has anything exlusive to iPad - all of these are standard cloud computing toolkits that you can use from any device that connects to the internet and supports the corresponding technology.
This cloud-based solution consists of the following building blocks:
- Cloud Server: a Linux instance running on DigitalOcean, AWS, GCP, etc.. This server is running 24/7 and is always connected to the Internet. This will be your virtual computer that does all the heavy-lifting of ML / DS for you. I am using DigitalOcean Droplet as my computing instance due to its simple pricing structure and easy-to-manage console.
- iPad: In this setup, your iPad Pro serves as your local “client”, i.e. a physical computing device that connects to the Cloud Server
- SSH (Secure Shell) / MOSH (Mobile Shell): SSH is a protocol that enables you to connect securely to your cloud server from local clients via Internet. SSH is the technology that makes it possible to use a terminal-like application directly with the cloud server. MOSH is an open-source mobile shell as an enhancement to the SSH. MOSH can resume your connection to cloud server even after your device’s connection to the Internet was interrupted (by rerouting the connection through an encrypted connection). Using MOSH will save you the hassle of having to reconnect to cloud instance via SSH every time your Internet connection is interrupted / changed or your SSH session timed out.
- Blink Shell App(or other iPad app supporting SSH and MOSH): This is a must-have app that works like a Terminal and supports both SSH and MOSH. I will be using Blink Shell throughout this tutorial.
How to Set Up the Solution
Step 0: Generating your SSH keys from Blink Shell
Before setting up your cloud instance, you will likely need to use SSH key from Blink Shell to connect to the instance. Follow below steps to generate your ssh key:
- Once your Blink Shell is installed on your iPad, fire up the app
- Type
configin the shell and you will see a settings UI poping up like below
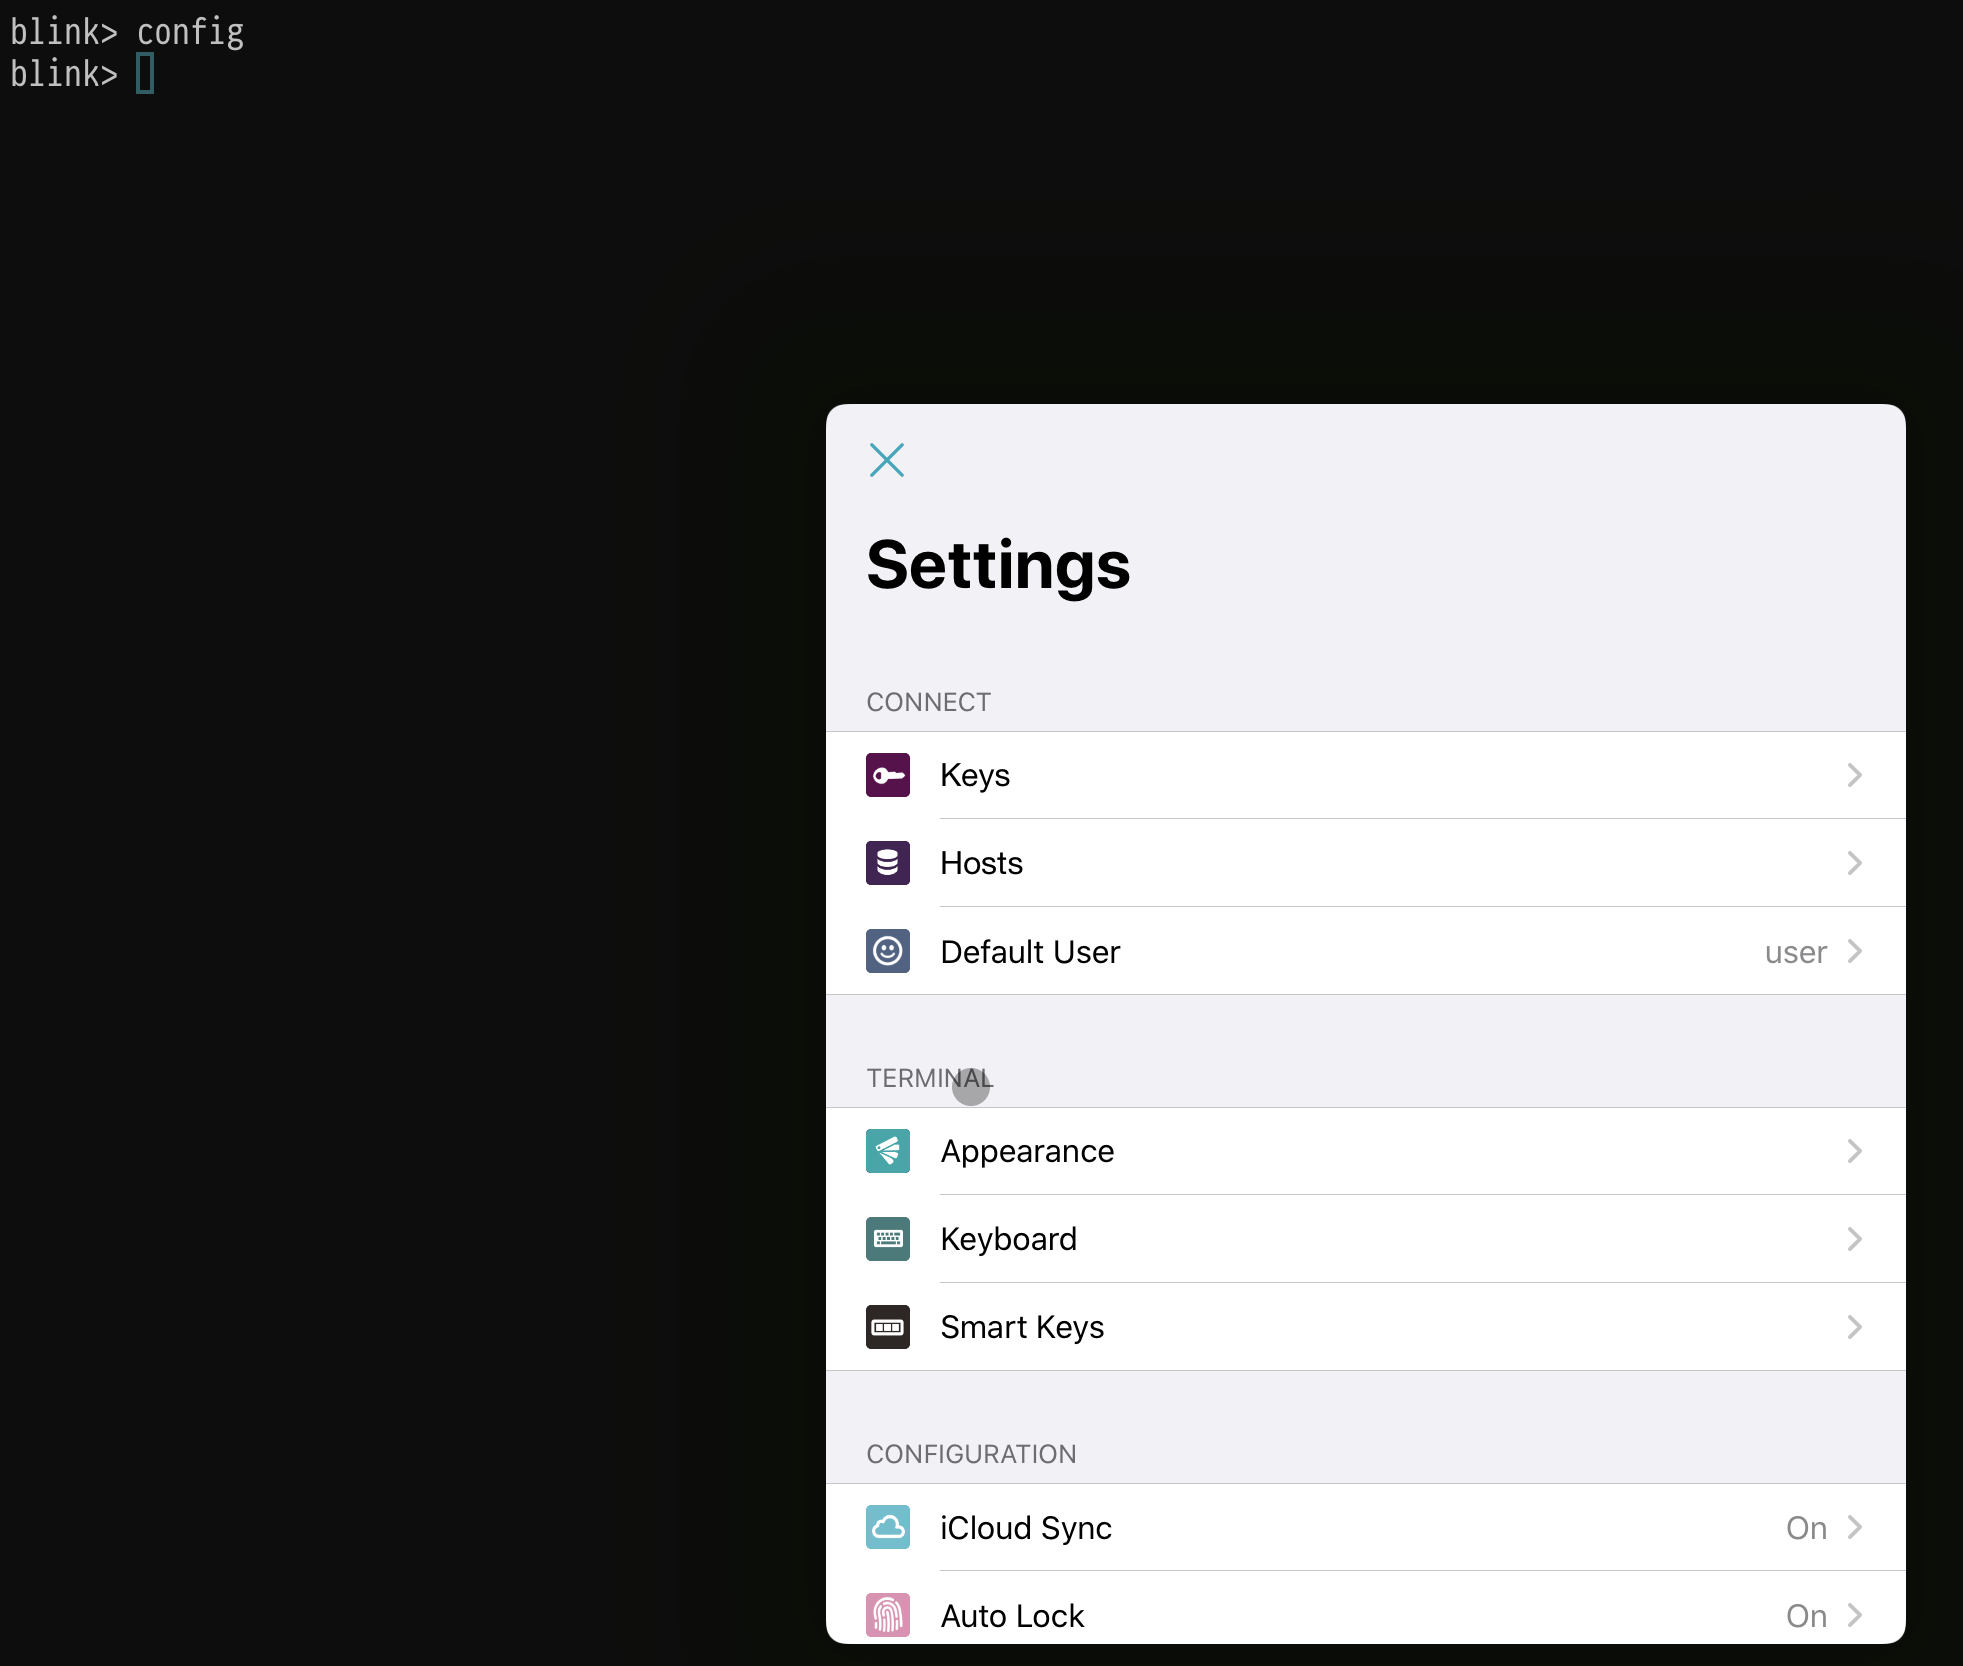
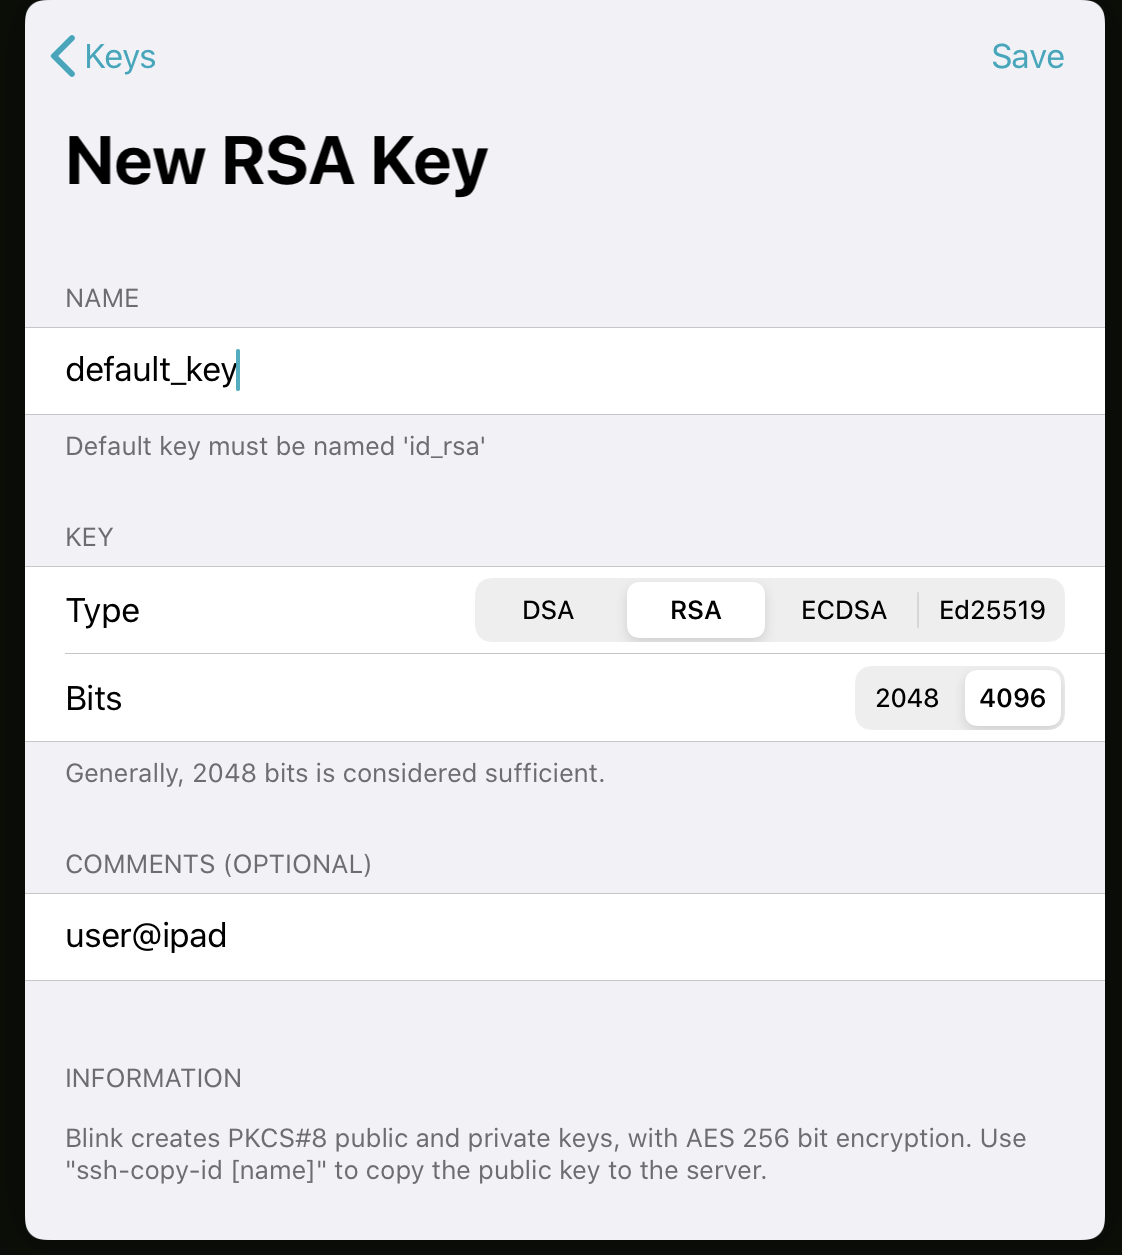
- Click on “Keys” -> “+” sign -> “Create New” to create a new key. Fill in the “NAME” field and keep everything else unchanged. Click on “Save” to generate the key. (Apparently there’s a command line way to generate the key directly, and you can follow the process here to do it)
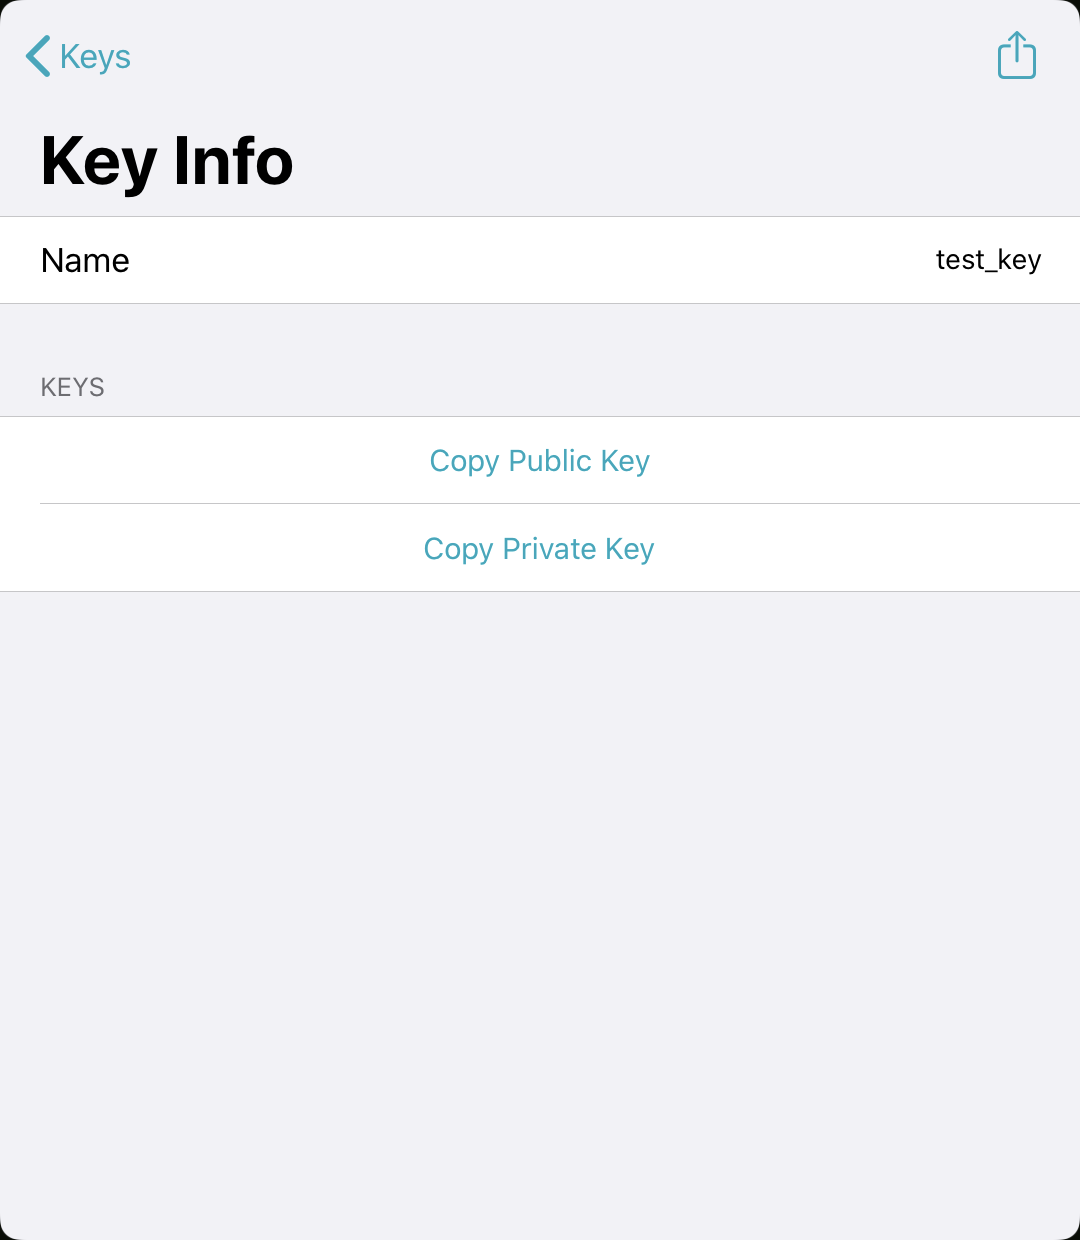
- The key will now be listed under “Keys”. Open it up and click “Copy Public Key” to copy the key text to your iPad clipboard
- Follow Digital Ocean’s Official Tutorial to add the public SSH key to your account. You only need to create your own Digital Ocean account to register the SSH key; there’s no need to create a droplet yet.
Now that the new SSH key is uploaded to your Digital Ocean account, you can move forward to the next step.
Step 1: Creating your cloud instance
The first step is to create a cloud instance. I followed Digital Ocean’s tutorial to set up my own droplet. A few items to note:
- You can choose Ubuntu 18 as your instance image since that gives you a clean set up to the instance. At a later stage, your backed up images based on your instance can be easily used to save you time on Ubuntu software installation
- For the Plan, you can start by using the cheapest possible (USD 5 per month) standard plan just for testing. I am currently using the USD 15 per month plan with 2 CPUs/2GB RAM/60GB Disk for my own cloud instance.
- If you want to maintain an image of your setup to be used later, you can opt for the “Enable backups” option
- In the Authentication section, opt for “SSH keys” and select the SSH key you registered in Step 0 above. By default, your new cloud instance will allow remote access via SSH.
Once your droplet is created, you will need your droplet’s IPv4 address for the following steps.
Step 2: Accessing Cloud Server via SSH in Blink Shell
Now it’s time to access to your brand new cloud instance and set up your SSH / MOSH access!
- From your Blink Shell, type
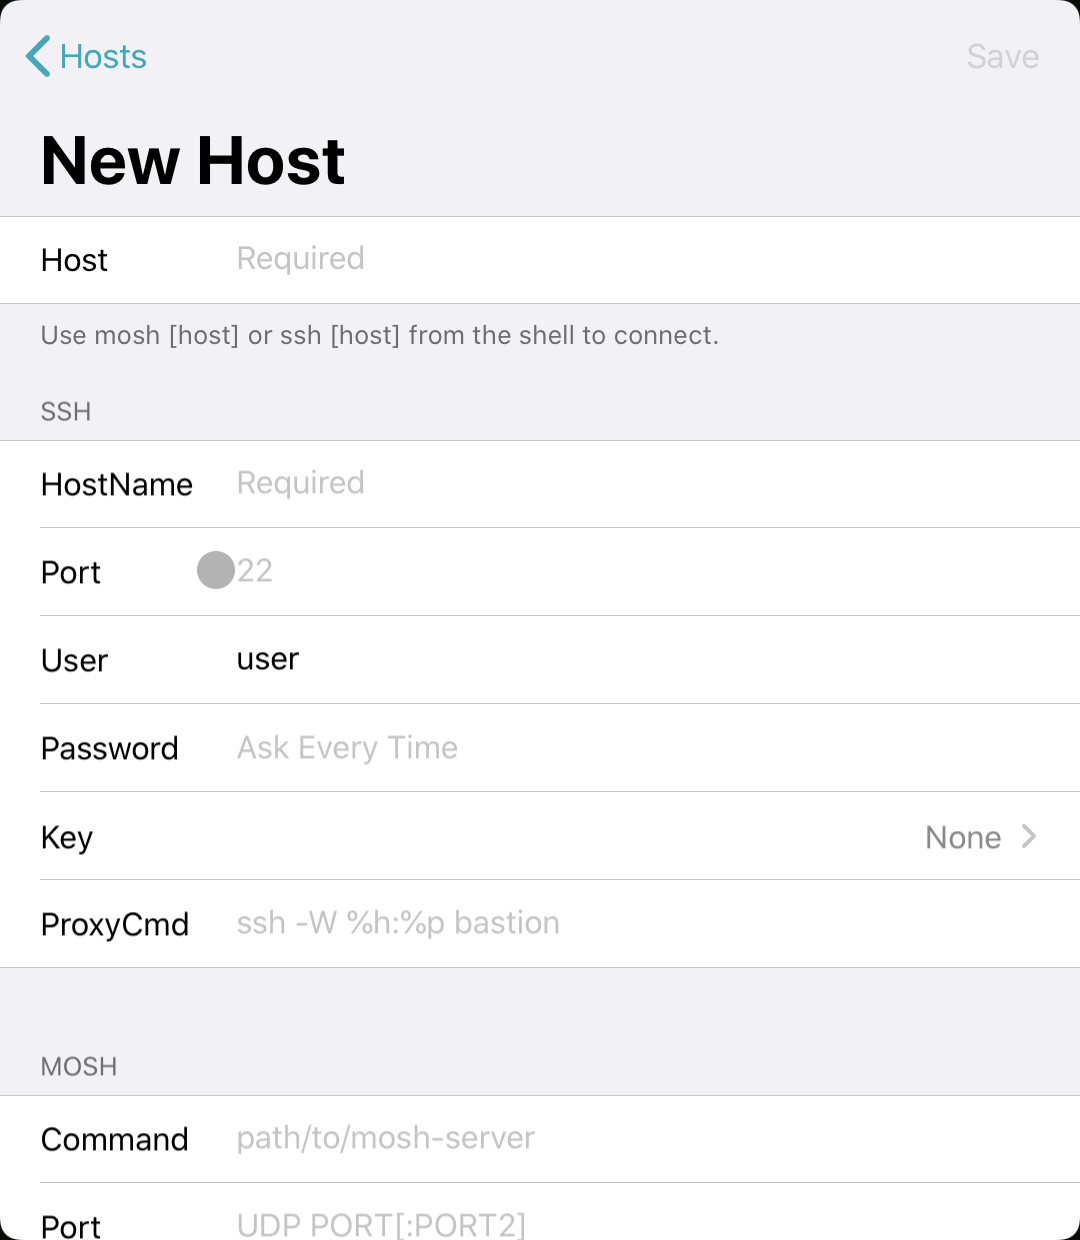
configto open up the configuration window. Click on “Hosts” -> “+” sign to create a new host - In
Hostfield, give this host a name of your choice. Under “SSH”, theHostNameshould be the IPv4 address from your cloud server. TheUsershould be “root”. TheKeyshould be the key whose public key you’ve registered with Digital Ocean from Step 0. You can leave all other fields blank for now. Click “Save” and return to the screen.
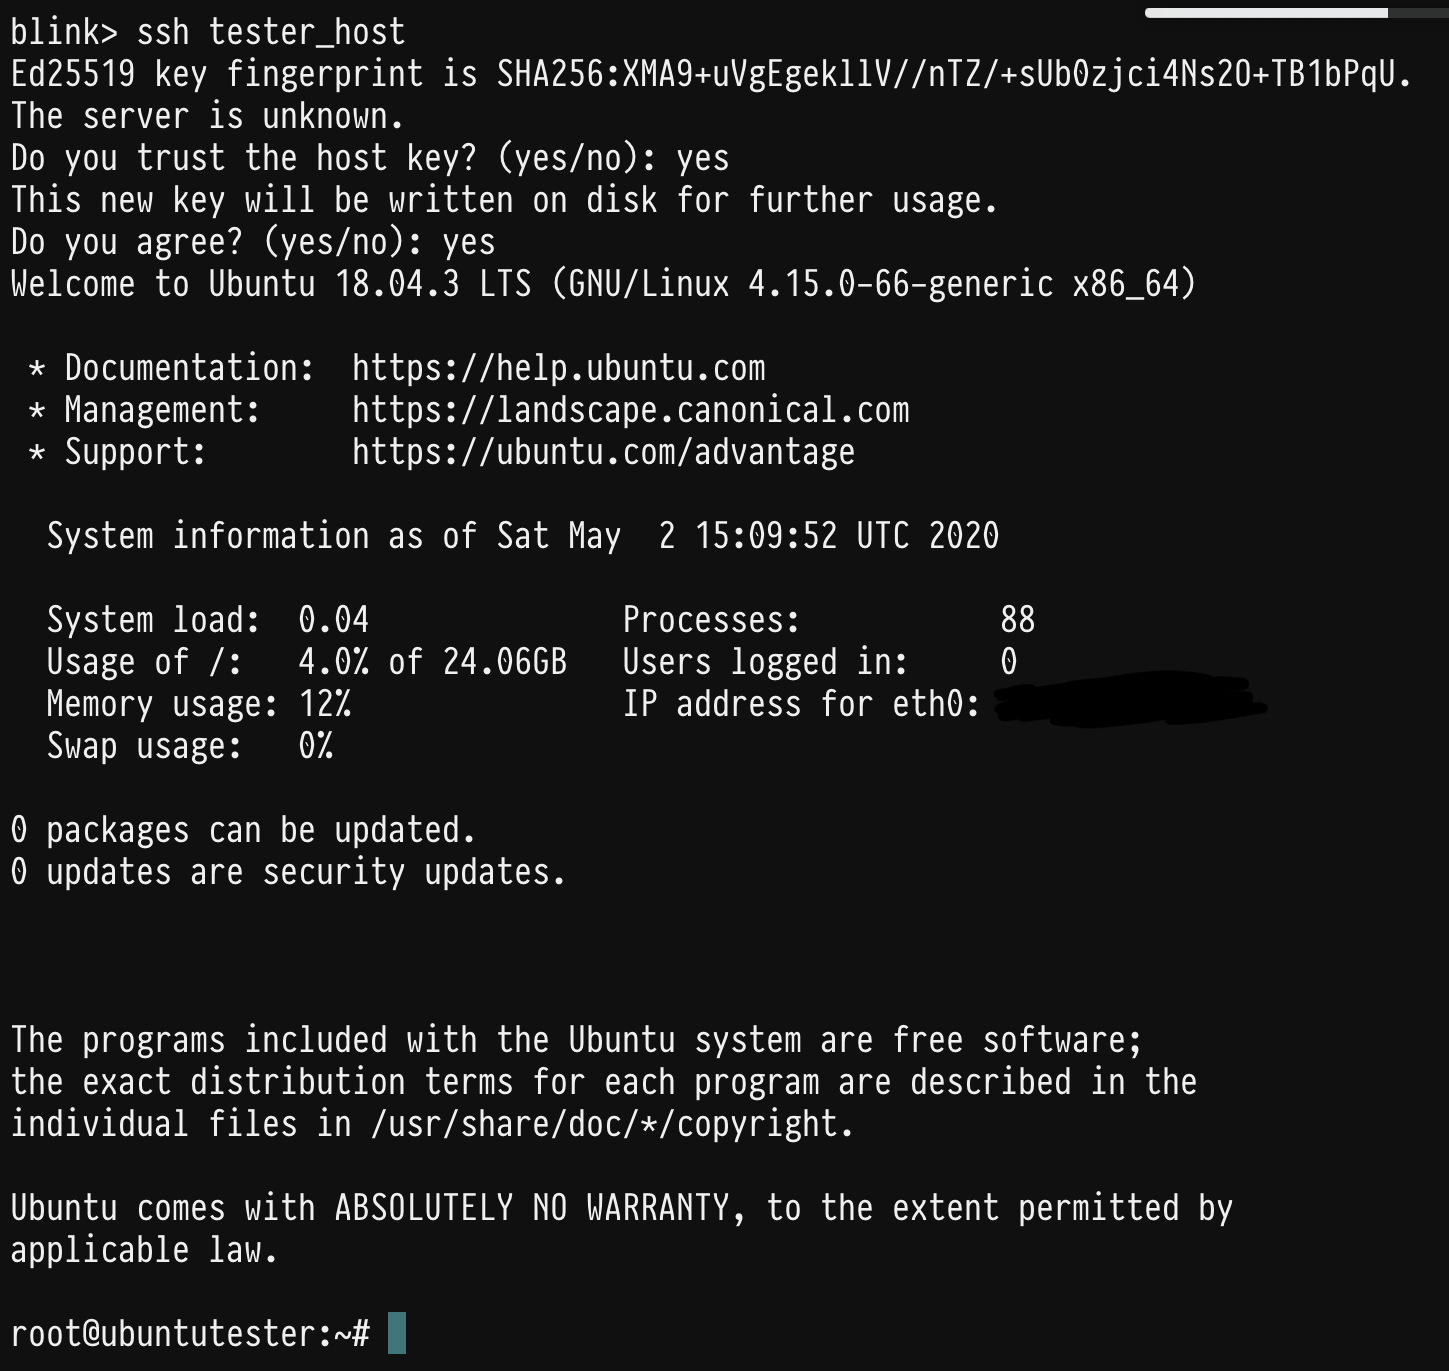
- From the command line, type
ssh your_host_name. You’ll be prompted of whether you trust the host key and whether you agree to write the key on disk for further usage. Give yes to both options. You should now be able to access your cloud instance.
- (Optional) If you hope to add an additional layer of security to your cloud instance, you can use
passwdcommand to create a password for yourrootaccount. You can edit the Host setting from Blink Shell by adding this password.
Step 3: Setting up MOSH connection
While connected to your cloud instance, follow this tutorial by Digital Ocean to install MOSH on your server. Or you can follow below steps:
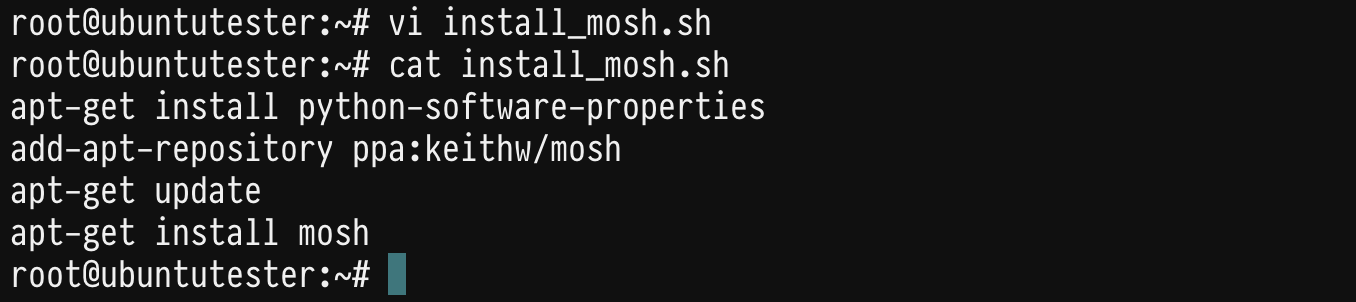
- While still in the SSH session, type
vi ~/install_mosh.shto open up a VIM editor, and paste following codes:
apt-get install python-software-properties
add-apt-repository ppa:keithw/mosh
apt-get update
apt-get install mosh
- Note that since you are logged in as
rootright now, you don’t needsudoto install MOSH. - Once you’ve pasted these codes, press ESC to exit editing mode, and then type
:wqto save the bash script. (You can configure your iPad Pro to use either CapsLock or Globe button as ESC by following this tutorial)
-
Make the script executable by running
chmod +x ~/install_mosh.sh -
Run the
install_mosh.shscript withbash ~/install_mosh.sh, granting “yes” to prompts along the way. -
Once the installation is complete, update the firewall setting with
ufwto allow for MOSH specific connections withufw allow 60000:61000/udpand your MOSH should be configured correctly. Note that this firewall setting doesn’t matter if you did not activate your firewall.udphere is the actual encripted connection protocal that MOSH uses to safely connect your Blink Shell to cloud instance. -
Exit your SSH session by typing
exitfrom bash. Once back to the Blink local shell, typemosh your_host_name. The connection should be established correctly. Now that you are in a MOSH session, you can close out your blink shell whenever you want, and “stay connected” to your cloud instance whenever you open up your blink.
Step 4: Additional Tips for Using MOSH for your cloud instance
Now that your terminal-like interface is ready to go, you can check out below tutorials to step up your iPad programming game:


Leave a Comment